Objective
Generating a QR code from a String value and printing the generated QR code into the printer without showing the print preview page by using Mendix Java action.
Initiation
QR code is the abbreviation for Quick Response Code. It is a type of matrix or two-dimensional bar code invented by a Japanese company named Denso Wave in 1994. QR code is a machine-readable optical label that contains the details about the product or item or material on which it is attached.
Nowadays we can see the QR code on most of the products that we buy. QR code can have many details, like the product details, manufacturing details, sender, recipient, and any other detail that we may want to add. We can produce up to 3.4*10^7111 of QR codes possibly.

Beneficiaries
There are many users of the QR Code technology like the manufacturing industry, automobile industry, courier services, advertisement business, travel & tourism, entertainment services, banking sector, IT and much more.

Mendix UseCase:
We can generate the QR code in Mendix by using some marketplace modules. In terms of printing the QR code, we need to download the QR and print it or we can write a custom Java action to execute that.
Challenge
Showing the "Print Preview Page" is a viable option when generating a small number of QR codes - one or two, or even up to ten. However, the same approach becomes inefficient when dealing with large quantities, as is the case with a big manufacturing unit or a major e-commerce company like Amazon. It is important to consider if this method is an effective and efficient way to handle generating and printing a large number of QR codes in such scenarios.

Mendix Solution
We don’t need Print preview processing every time, right? By skipping this process, we can save much more time. We can instead make a Custom Java Action. By this Custom Java Action, our use case is Cent percent achievable.
Prerequisites:
Mendix Studio Pro: Version 8.18.1
Eclipse IDE: To build Custom Java Action
Step 1: Create a blank web Application
- Open the application
- Open the application
- Insert the Card Action building block into the Home_Web page
- Open the properties panel of Icon and change it to more relevant
- Rename the button to QR generation and printing
- Create an Entity with the name of QRCode and inherit from the System.Image and add the attribute with name of Text (String).
Step 2: QR Code Generation by using Custom Java Action
- We can code a custom Java action to generate a QR code, there are many libraries available for generating a QR Code. I’m using a ZXing library to achieve our use case.
- Add a custom Java action and name it JA_QRGeneration
- Add the three parameters as mentioned in the below figure 2
Parameter Details:
- InputString – Passing a string value to convert as QR code
- TargetLocation- Saving a generated QR code
- WidthHeight- value for height and width of the QA code

Step 3: Implementing QR code Generation process
- Add a blank page and design like the figure: Step-3.1

Figure: Step-3.1 (QRGenerator Page )
- Create a DS microflow for the data view

Figure: Step-3.2 (DS Microflow)
-
Text box: Providing a string input to generate a QR Code
-
“Generate QR Code” button will trigger the QR code generation process
- Once the QR code is generated it will be visible, including the Download button
- Connect Generate QR Code button into the Microflow for generating the QR code. Figure 3.3
- Save and deploy the project into Eclipse IDE
- Connect the parameters like figure 3.4

Figure 3.3

Figure 3.4
Step 4: Custom Java coding process- QR code generation:
- To build a custom java action we need to push the code to Eclipse
-
Select Project -> Deploy for Eclipse or press F6
- Wait for a minute until the info pop will show a message
- Go to Eclipse and open the project by
-
Select File select “Open Project From File System” option
- Click the “Directory” button and select your project folder
- Wait for a minute until the “Finish” button is available
- Click finish
- Go to the Java action named JA_QRGeneration
- Import the below mentioned services classes in the import section

-
Paste the blow code inside User code section

Notes: Codes are removed automatically when it’s written after the user code section and extra code section. It’s a Mendix behaviour.
Step 4: Adding button for the print function
-
Until now we have QR code generation function and downloading option
-
To print the QR code we need to trigger the microflow which has the Custom Java Action to accomplish our use case.
-
Add one button with the name of “Print” on the page like figure: Step-4

Figure: Step-4
Step 5: Connecting Microflow
-
Set the On Click event to “Microflow call” for the Print button
-
Name the microflow “ACT_Print_QR”
-
Refer to the figure: Step-5

Figure: Step-5
Step 6: Working in Microflow
-
Open the microflow named “ACT_Print_QR”
-
Pick a “Microflow Call” activity from the tool box and attach it in a flow like a Figure: Step-6
-
Map the argument “$QRCode”in the activity in microflow call activity
-
Pick a “Java Action call” activity from the toll box and attach it in a flow like a figure: Step-6

Figure: Step-6
-
An error would arise because we didn’t build Java Actions till now
Step 7: Creating Custom Java Action
-
Name it “JA_Print”
-
Open the java action by double-clicking it
-
In order to print the QR code that has been generated, it is necessary to pass the corresponding parameter.
-
Click add button then the “Add Java Action Parameter” pop up will open
-
Provide the name for the parameter as “qrImage”
-
Select type as Object
-
Select the Entity which holds our generated QR code image. In our case, the entity is “QRCodeGenerator.QRCode”
-
Select the return type as “Boolean”
-
Refer to the Figure: Step-7
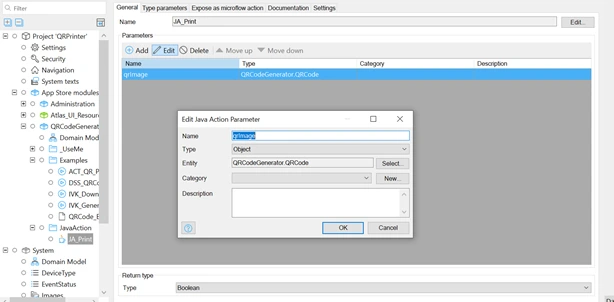
Figure: Step-7
-
Map this “JA_Print” java action into Java Action call activity in “ACT_Print_QR” microflow
-
And set an Input as “$QRCode” to the Java action refer Figure: Step-7.1
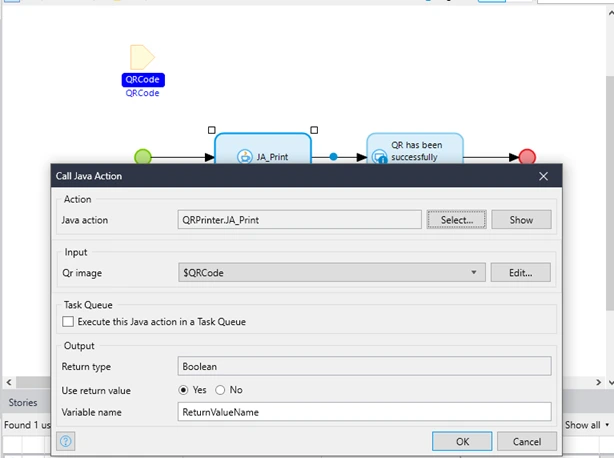
Figure: Step-7.1
Step 8: Writing custom Java code
-
We are almost done with 70% of the process
-
To build a custom java action we need to push the code to Eclipse
-
Select Project -> Deploy for Eclipse or press F6
-
Wait for a minute until the info pop shows a message
-
Go to Eclipse and open the project by
-
Select File -> select “Open Project From File System” option
-
Click the “Directory” button and select your project folder
-
Wait for a minute until the “Finish” button is available
-
Click finish
-
Refer to the figure: Step-8
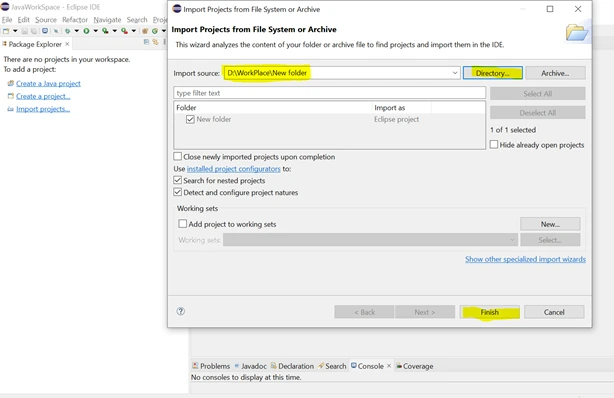
Figure: Step-8
-
Open Project folder -> javasource -> qrcodegenerator.action -> JA_Print
-
The custom java file will be there, Refer to the figure: Step-8.1
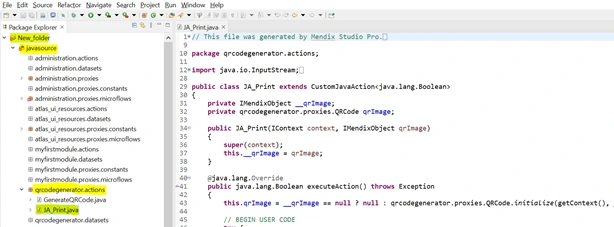
Figure: Step-8.1
-
Copy and paste the below code into the “JA_Print” file within //BEGIN USER CODE and //END USER lines
Custom code
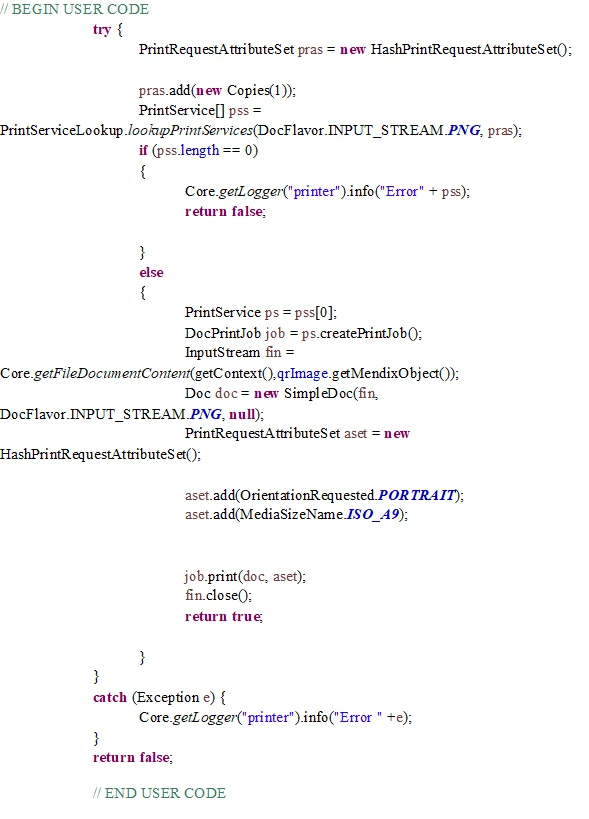
-
Save the file and move to Mendix studio pro
-
Link the “QRCode_Example” overview page into the “Home_Web” page card action
Step 9: Result
-
Run the application in local
-
Click the “QR Generation and Printing” option
-
Then the QR code generation page will open
Figure: Step-9
-
Enter the string input and click the “Generate QR Code” button
-
Then the generated QR code will be shown below
-
Refer to the figure: Step-9.1
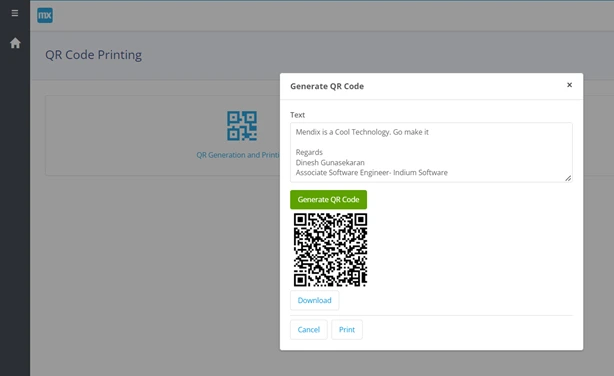
Figure: Step-9.1
-
Click the “Print” button to print the QR into your machine’s default printer without showing any print preview pages or print dialog pages.
-
That’s it! We are good to go!
Let’s meet in the next blog! Please post your comments and queries and feel free to contact me!
